
Introduction
For this project I wanted to look at Serial communication in order to form an understanding of how the Arduino communicates to the IDE. In addition I wanted to look at how data can be parsed from the internet, manipulated and then sent to the Arduino and displayed using external sensors. The Visual Weather Forecast was my idea for a project that would present a brief overview of the weather e.g. for the upcoming week.
Background Information
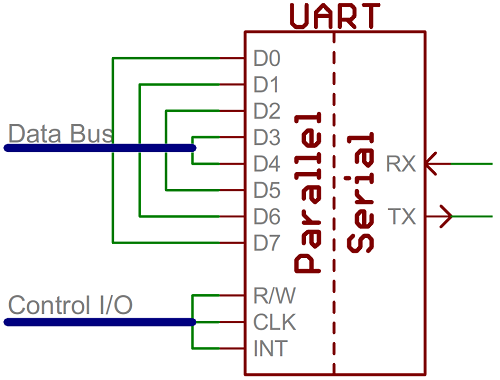
Communication between electronic circuits need to share a common protocol so that data transfer is successful. This can be done using either serial or parallel communication. In the example shown below, parallel communication sends 8 bits ‘a bus’ of data for every clock pulse sent. However series communication sends only one bit of data for every clock pulse. As a result parallel communication is significantly faster than series but at the expense of using more I/O lines between receiver and transmitter.

Within serial communication there are synchronous and asynchronous interfaces. A synchronous interface pairs all the data lines with a common clock leading to faster communication. Asynchronous interfaces use an external clock signal at the benefit of using fewer I/O pins again.
The Arduino Uno uses UART TTL (5V) serial communication to send and receive data between itself and the IDE on a computer via a USB drive [1]. TTL serial signals exist between the 3.3v or 5v line of the Arduino and the ground-line at 0v. An idle signal starts at VCC (3.3v or 5v) corresponding to a bit value of 1 and then drops to a 0 for the start bit. The bit pattern follows the start bit as it proceeds with the LSB until the MSB. The stop bit follows this which is at a value of 1 [2].

A UART acts as an interface allowing the eight parallel bits of data to be transferred via a serial connection between the Arduino and the computer. The Arduino uses an ATmega16U2 chip for this serial communication via the USB.
The speed at which the data is transmitted over a serial line between the Arduino and the IDE is specified by the Baud Rate. Both devices need to have the same baud Rate in order to communicate effectively and ensure that data is successfully transferred[3].

How does it work?
The project uses two IDE’s, the Arduino’s default one and a separate one called Processing. Processing is used to parse data from a URL (in this case a weather website) by searching for six different weather conditions for the e.g. upcoming week. Each time it finds a condition it increments a variable to store that condition. Processing then communicates with the Arduino’s default IDE by sending a string of numbers preceded by an asterisk e.g. *101100 (this updates every 10 seconds to get the latest weather conditions). The numbers represent the frequency of the six different weather conditions that were looked for in the upcoming week. The first number represents the condition ‘Clear Sky’s’ the next number represents the condition ‘Clouds’ etc. The asterisk is sent so that the Arduino IDE will know to store the next six numbers when it receives it. The weather conditions in the order of the sent string are: ‘Clear Sky’s’, ‘Clouds’, ‘Drizzle’, ‘Rain’, ‘Thunder’, ‘Other’ (e.g. Snow / Mist).
The program starts with the Arduino IDE blinking the snow/mist LED until it finds the asterisk (this acts as a waiting light until the data is received). Once it finds it the numbers after are stored in an array and are than assigned to variables representing the corresponding weather condition. The code then blinks the LED’s (one at a time and starting at the rightmost LED) depending on the frequency of each weather condition in the upcoming week. It then waits five seconds before blinking the snow/mist LED so that it’s blinking as it waits to receive data is not confused with an actual weather event of snow or mist.
This project was created to give a brief overview of the weather over a time period without going into the detail of what the conditions on each particular day are. This was done because the weather conditions on a particular day can often change several times during a week/month and if someone just wanted a quick overview then this project would be ideal.
Project Build
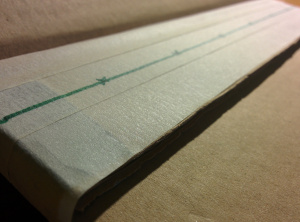
The pictures below show some of the build process:
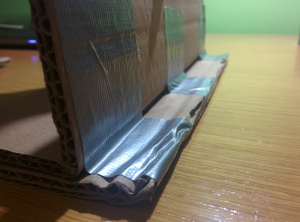
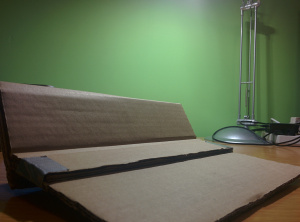
A cardboard frame was constructed to act as a stand for the LED’s and to hide the Breadboards and Arduino behind it.

The position of each LED was marked on the cardboard. The snow / mist condition is represented by a single red LED, thunder by a large red LED, rain by 2 clear LED’s that flash blue, drizzle by a single clear LED that flashes blue, cloudy by a green LED and Clear Sky’s by two green LED’s.
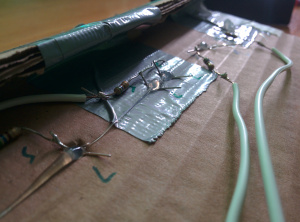

Resistors were added to the positive side of the LED’s while the other side was connected to bell wire and onto the pins on the Arduino.

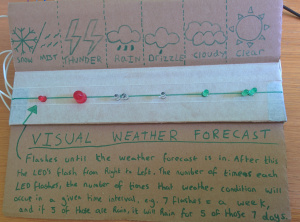
The weather conditions of each LED were drawn on with pen and instructions on how to interpret the display were written on the cardboard.
The video below shows an example of the display in action. The laptop shows the Processing IDE reading the feed from the weather website and then sending the string *106000. The snow/mist LED blinks as the Arduino waits to read the asterisk. It then flashes the ‘Clear Sky’s’ LED once and the ‘Rain’ LED six times in correspondence with the string that was received. It then goes back to blinking the snow/mist LED again as it waits for the asterisk.
The code below shows what was written for the Arduino IDE and Processing IDE.
Arduino Code:
// Visual Weather Forecast

//Defining the pins that connect the Arduino to each weather condition LED.
#define other 2
#define thunder 4
#define clear 7
#define rain 8
#define drizzle 5
#define cloudy 13

//Variables for storing the weather condition frequency.
int clear_count = 0;
int cloudy_count = 0;
int drizzle_count = 0;
int rain_count = 0;
int thunder_count = 0;
int other_count = 0;

char buffer[7] ;
int pointer = 0;
byte inByte = 0;


void setup()
{
  Serial.begin(9600);  // Serial port is opened and the baud rate is set.
}

void loop()
{

  while (Serial.available() > 0)  {    //Wait for data to be sent from Processing.

    //Flash an LED while waiting for an '*' to be sent.
    for (int i = 0; i < 2; i++) {
      digitalWrite(other, HIGH);
      delay(1000);
      digitalWrite(other, LOW);
      delay(1000);
    }

    // Read the incoming byte:
    inByte = Serial.read();

    // If the asterix is found then store the next six chars.
    if (inByte == '*') {

      while (pointer < 6) {
        buffer[pointer] = Serial.read(); // store the char in the buffer
        pointer++; // move the pointer forward by 1
      }

      //Convert the Hex chars to decimal.
      clear_count = hextodec(buffer[0]);
      cloudy_count = hextodec(buffer[1]);
      drizzle_count = hextodec(buffer[2]);
      rain_count = hextodec(buffer[3]);
      thunder_count = hextodec(buffer[4]);
      other_count = hextodec(buffer[5]);

      int i;
      int delayvar = 500;

      //Flash the LED's for the amount of times each weather condition is to occur.
      delay(1000);
      for (i = 0; i < clear_count; i++) {
        digitalWrite(clear, HIGH);
        delay(delayvar);
        digitalWrite(clear, LOW);
        delay(delayvar);
      }
        delay(delayvar);

      for (i = 0; i < cloudy_count; i++) {
        digitalWrite(cloudy, HIGH);
        delay(delayvar);
        digitalWrite(cloudy, LOW);
        delay(delayvar);
      }
      delay(delayvar);

      for (i = 0; i < drizzle_count; i++) {
        digitalWrite(drizzle, HIGH);
        delay(delayvar);
        digitalWrite(drizzle, LOW);
        delay(delayvar);
      }
      delay(delayvar);

      for (i = 0; i < rain_count; i++) {
        digitalWrite(rain, HIGH);
        delay(delayvar);
        digitalWrite(rain, LOW);
        delay(delayvar);
      }
      delay(delayvar);

      for (i = 0; i < thunder_count; i++) {
        digitalWrite(thunder, HIGH);
        delay(delayvar);
        digitalWrite(thunder, LOW);
        delay(delayvar);
      }
      delay(delayvar);

      for (i = 0; i < other_count; i++) {
      	digitalWrite(other, HIGH);
      	delay(delayvar);
      	digitalWrite(other, LOW);
      	delay(delayvar);
      }
      delay(5000);

      pointer = 0; // reset the pointer so the buffer can be reused
     }
    }
   }

   // converts one HEX character into a number
   int hextodec(byte c) {
   	if (c >= '0' && c <= '9') {
   		return c - '0';
   	}     else if (c >= 'A' && c <= 'F') {
      return c - 'A' + 10;
    }
}
Processing Code:
//Visual Weather Forecast

//Imports
import processing.serial.*;
import java.net.URL;
import java.net.URLConnection;
import java.io.InputStreamReader;
import java.util.StringTokenizer;

//The website which stores the data.
String feed = "http://api.openweathermap.org/data/2.5/forecast/daily?q=London&mode=xml&units=metric&cnt=7";

int interval = 10;  // retrieve feed every 60 seconds;
int lastTime;       // the last time the content was fetched

// Variables for counting the weather conditions.
int clear_count = 0;
int clouds_count = 0;
int drizzle_count = 0;
int rain_count = 0;
int thunder_count = 0;
int other_count = 0;

Serial port;
color d;
String weatherdata;

String buffer = ""; // Accumulates characters coming from Arduino

PFont font;

void setup() {

  size(640,580);
  frameRate(10);    // we don't need fast updates

  font = loadFont("Garamond-32.vlw");
  fill(255);
  textFont(font, 32);

  //Connecting Processing to the COM3 Arduinos port.
  String arduinoPort = Serial.list()[0];
  port = new Serial(this, arduinoPort, 9600); // connect to Arduino

  lastTime = 0;
  fetchData();
}

void draw() {

  background( d );
  int n = (interval - ((millis()-lastTime)/1000));

  d = color(50, 50, 50);

  weatherdata = "*" + clear_count + clouds_count + drizzle_count + rain_count + thunder_count + other_count;


  text("Visual Weather Updates", 10,40);
  text("Reading feed:", 10, 100);
  text(feed, 10, 140);

  //text("Next update in "+ n + " seconds",10,500);

  text("clear" ,10,200);
  text(" " + clear_count, 130, 200);

  text("clouds ",10,240);
  text(" " + clouds_count, 130, 240);

  text("drizzle ",10,280);
  text(" " + drizzle_count, 130, 280);

  text("rain ",10, 320);
  text(" " + rain_count, 130, 320);

  text("thunder ",10, 360);
  text(" " + thunder_count, 130, 360);

  text("other",10, 395);
  text(" " + other_count, 130, 395);

  text("sending", 10, 430);
  text(weatherdata, 135,430);


  if (n <= 0) {
    fetchData();
    lastTime = millis();
  }

  port.write(weatherdata); // send data to Arduino

}

void fetchData() {

  // Strings to parse the feed
  String data;
  String chunk;

  // zero the counters
  clear_count = 0;
  clouds_count = 0;
  drizzle_count = 0;
  rain_count = 0;
  thunder_count = 0;
  other_count = 0;

  try {
    URL url = new URL(feed);  // An object to represent the URL.
    // Prepare a connection.
    URLConnection conn = url.openConnection();
    conn.setRequestProperty("User-Agent", "Mozilla/5.0");
    conn.connect(); // now connect to the Website

    // Data from the feed is connected to a buffered
    // reader that reads the data one line at a time.
    BufferedReader in = new
      BufferedReader(new InputStreamReader(conn.getInputStream()));

    // Read each line from the feed.
    while ((data = in.readLine()) != null) {

      StringTokenizer st =
        new StringTokenizer(data,"\"<>,.()[] ");// break it down
      while (st.hasMoreTokens()) {
        // Each chunk of data is made lowercase.
        chunk= st.nextToken().toLowerCase() ;

        if (chunk.indexOf("01d") >= 0 )// found "clear"
          clear_count++; // increment clear by 1
        if ((chunk.indexOf("02d")  >= 0) || (chunk.indexOf("03d")  >= 0) || (chunk.indexOf("04d")  >= 0))
          clouds_count++;
        if ((chunk.indexOf("09d") >= 0))
          drizzle_count++;
        if ((chunk.indexOf("10d") >= 0))
          rain_count++;
        if ((chunk.indexOf("11d") >= 0))
          thunder_count++;
      }

    }
    //other = snow or mist.
    other_count = 7 - clear_count - clouds_count - drizzle_count - rain_count - thunder_count;

  }
  catch (Exception ex) { // If there was an error, stop the sketch
    ex.printStackTrace();
    System.out.println("ERROR: "+ex.getMessage());
  }

}
How does it work?
- I could have put an input sensor on the Breadboard to feed information back from the Breadboard to the Arduino and then onto processing e.g. a button is pushed, get weather data, store it and then turn on and flash the LED’s.
- Instead of searching for words by parsing the weather URL I decided to utilise the XML document that the weather data could be converted into so that I could find data on the site more easily. This is because the XML document puts the data into an HTML like format allowing information that is contained within nodes and subnodes to be accessed easily. As an extension to this I could have used this method to show other weather data such as wind speed etc. although the LED’s would probably need to be updated to something that could present the data more clearly e.g. an LCD screen.
The code below was added to the Processing IDE in order to read the XML document:
//Defnitions
XML xml;
int id = 0;
String name;
String coloring;

void setup() {

xml = loadXML("test.xml");
XML[] children = xml.getChildren("time");
println(xml.listChildren());

xml = loadXML("test.xml");
XML[] children = xml.getChildren("symbol");
println(firstChild.getContent());


for (int i = 0; i < children.length; i++)
{
  int id = children[i].getInt("number");
  String coloring = children[i].getString("name");
  //String name = children[i].getContent();
  println(coloring + ", " + id + ", ");
}
}
Links
[1] https://www.arduino.cc/en/Main/arduinoBoardUno
[2] https://www.pololu.com/docs/0J29/4.a
[3] https://cdn.sparkfun.com/assets/d/1/f/5/b/50e1cf30ce395fb227000000.png